Never Going To Give Up My SPL Meter
 If pressed, I’d have to say that my two favorite tools in my toolbox are my multimeter and my SPL meter.
The multimeter is a favorite because, as it’s name implies, it’s versatility allows you to measure everything electrical that needs measuring: voltage, amperage and wattage.
Conversely, unlike the versatility of the multimeter, the SPL meter only measures one thing: sound pressure levels. But that’s no reason to not enjoy using it.
If you want to be an AV pro, you need to have both of them. Although to be honest, when I say I have an SPL meter in my toolbox, it’s a metaphorical toolbox, rather than an actual one.
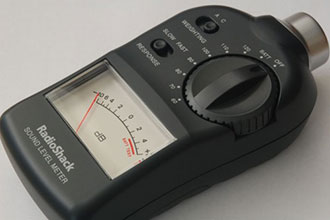
While I’m not entirely sure what happened to my trusty old analog Radio Shack SLP meter (I think it’s in one of these boxes under the stairs), the SPL app on my iPhone gets even more use than my old analog unit ever did.
There’s plenty of SPL apps to choose from for iPhone and Android, I use Decibel Ultra, which is a free app, but no less handy for that.
The fact is, and I’m sure I’m preaching to the choir here, an SPL meter is critical to fine tuning an AV installation. Whether you’re tuning up a home cinema or setting the levels in a commercial PA system, you need to use your SPL meter to make it all sound great.
When using an SPL meter, there are two choices: “A” and “C” weighting, and the rate of response. “A” weighting will make the meter more sensitive to frequencies between 500-10,000 Hz, and “C” weighting is a more even measurement across 32-10,000 Hz. Most of the time “C” weighting is what the technician will need to measure.
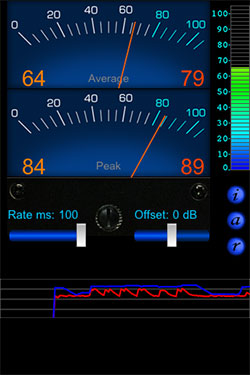 With response time, whether it’s “SLOW” or “FAST” or one where the technician can adjust the rate in milliseconds at which the meter measures, the slower setting can be used for determining an average SPL level, while the more sensitive faster setting will respond more quickly to peak levels. However, most SPL meter apps display both the average and peak readings on the display for reference, so setting response time isn’t necessary, but it’s still important to know the difference.
The job of the installer and his SPL meter is to ensure that sound pressure levels are reasonably constant in a variety of listening positions. The information that the SPL meter delivers will impact decisions like speaker position, seating position, as well as how furnishings and acoustic treatments are positioned in the room.
When setting the speaker levels for a room the technician with the SPL meter should sit in the main seating area. Begin with the levels for each speaker channel at zero. Working one speaker at a time with the receiver’s test tones adjust the speaker level to measure at 75 dB. If it’s not possible to easily reach that reading, because it’s either too high or too low that’s when adjustments like furnishings and acoustic treatments to level out the listening spot.
Equipped with an SPL meter app on a smart phone and the basics of how to measure sound and adjust speakers levels even a novice installer can do a great job.

More Stories Like This
Communications and Client Management

The key to a healthy relationship is open, clear communication. That applies to not only personal relationships, but also business ones. And central to having a positive relationship with your clients is how well you and they communicate with each other. That clarity has to begin right away. In the initial discussion and subsequent needs […]
Managing Lead Times in the COVID Era

I’m at the point where I’m genuinely tired of dealing with the impact of COVID-19 on business, and I’m definitely tired of talking about it. But, as they say, we play the hand of cards we have dealt. There are a lot of complications that we have to face today as a result of COVID. […]
The Threat of Substitution Is Always Around the Corner

So I had a particularly notable and unsatisfying customer service experience this year. I say “this year” because it’s been slowly unfolding like a slow-motion train wreck throughout almost all of 2020. Bear with me here, because it’s kind of a convoluted tale. There’s a brand of outdoor apparel that I’ve been loyal to for […]