Human Projection Mapping: Behind the Magic
Sara Abrons recently shared a video of Human Projection Mapping done by Omote artist Nobumichi Asai. It is an amazing display of what can be done today in AV if you are able to combine your creative skills with available technology.
It has been asked repeatedly if being in the AV industry ruins the “magic” of these types of experiences, whether watching them remotely or at live events. I’ll say for me, it hasn’t because I’m always excited to see how the experience is created, and then can appreciate all the behind the scenes work needed to pull something like this off.
With that, I thought I’d shed some light on human projection mapping (pun intended) for those who may not know what is going on here behind the scenes. I’ll use the video Sara shared as a reference.
1) Build a Model.
Light bends as it hits different surfaces. If you project a straight line on a curved surface, the line will appear curved. If you want the line to still appear “straight” you actually have to adjust the line by curving it in the opposite direction before projecting it. Now when this curved line is projected at the curved surface, the line appears straight.
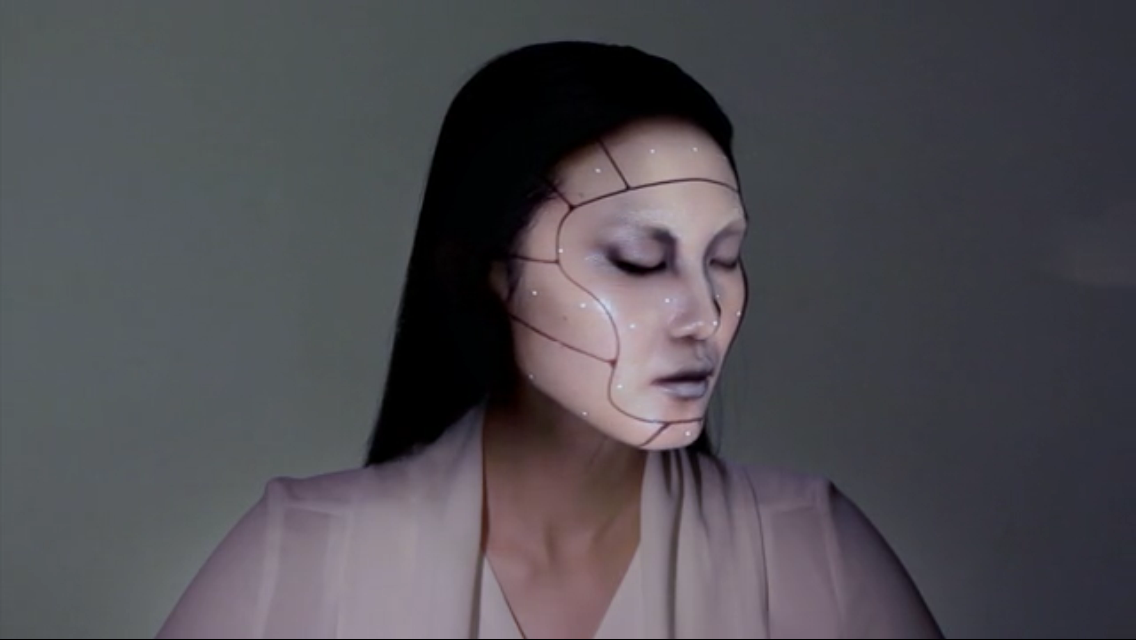
In order to do this, you need to know all of the surfaces you will be projecting on and build a 3D model. With buildings or other manufactured or constructed objects, there may be existing 3D models to work with. In the case of Human Projection Mapping this 3D blueprint is only contained in DNA so it would be difficult at best to extract! THis is where 3D scanning comes in. A 3D scanner can be used to map a face and to create a digital recreation via a 3D model. It is very akin to the old analog way to do this which was to put someone’s face in plaster and create a mold, and then uses that to cast a bust. Hollywood has done that for years when making masks specific to an actor’s or actress’ face.
In the case of the video, they created a 3D version of the models head using a 3D scanner, and then used that model to create the projected content.
The video likes to make you think that it scans her head in real time and then starts projecting, but this is not the case. The green line scanning effect is part of the process, but it is done way beforehand. The scanning effect in the video is really just more “art”.
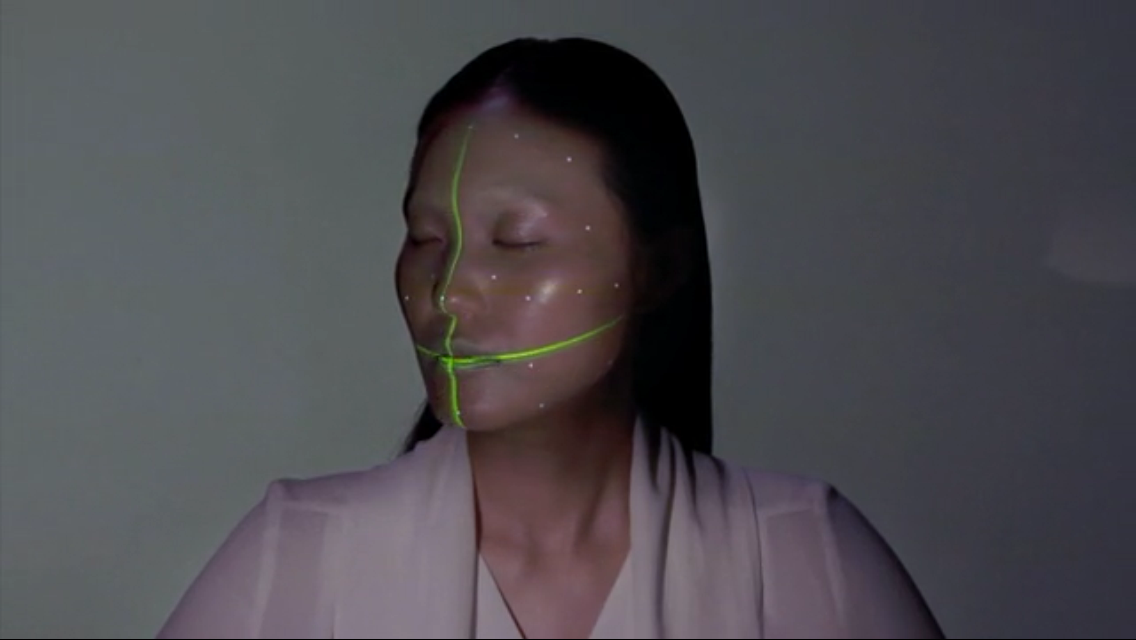
The 3D scanning in the video is part of the process, it just happens much earlier, not in real time.
2) Create Content
Now that a model is created, the artist can start to create the content that he or she wants to project. There are several 3D modeling software solutions on the market that can be used. It’s very much like creating a set of videos or skins and textures that can be later triggered or played back on top of the 3D model that was created. This is where creativity and content creation skills are definitely key.
3) Object Tracking
Now if you were doing projection mapping on a static object, your job would’ve been nearly complete. However in this case, the object is a human being, and the human being is moving. How do you adjust the image to real time motion of an actor or actress?
If you’ve ever played with a 3D model on your computer, you can manipulate the model, turn it side to side, etc by using a mouse. Pretty simple. In the case of human projection mapping, you want to be able to turn the model’s face into a mouse. How do you do that? Moles.
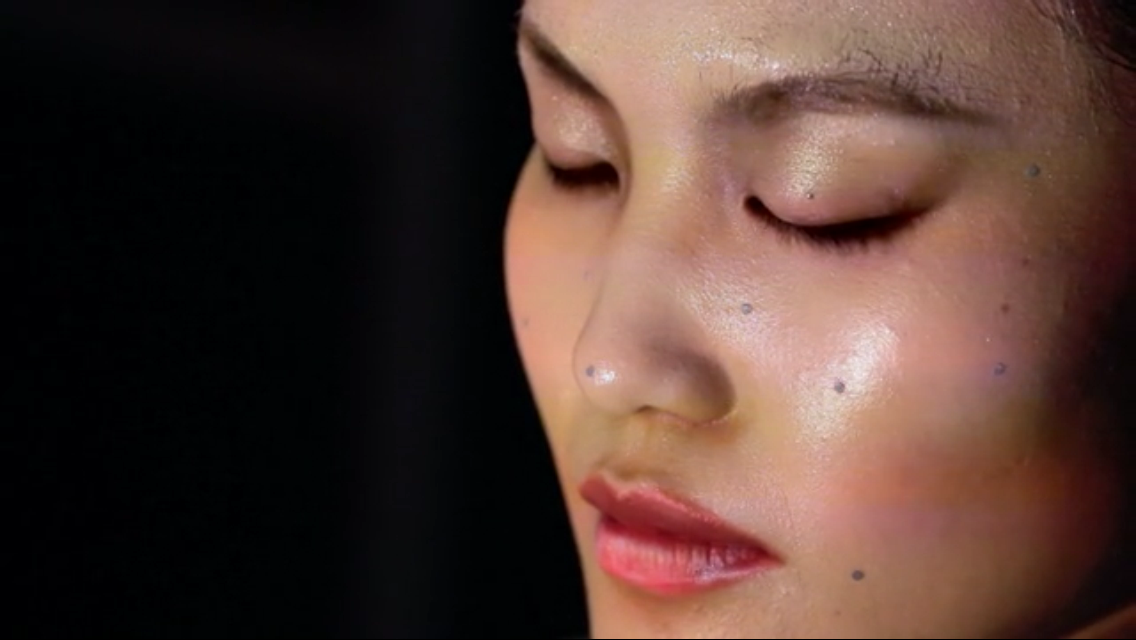
The “off axis” camera shot shows the models face with multiple “beauty marks”.
The shot above shows the actress’ face from an angle, and it appears that she has a few beauty marks. However this is just good make up work. If you look at the shots done from the front, you will notice that these moles are white. These are not dots being projected onto the model. Rather, they are dots that are reflecting light back. These “moles” are most likely coated with a reflective material, which is being illuminated by an infrared light source, and then reflected back to an IR camera that tracks the motion of these dots.
When illuminated, the “moles” become reference points for tracking.
The first time I saw this technology was in an Apache helicopter as a kid, where the gun moves when the gunner turns his head to look at a target. The gunner’s helmet had lights on the back that were tracked by sensors on the headrest of his seat. For most of us, Nintendo’s Wii is a very familiar example of the same thing, the Wii controller has the IR camera inside, while the Wii bar has two IR lights that the controller tracks.
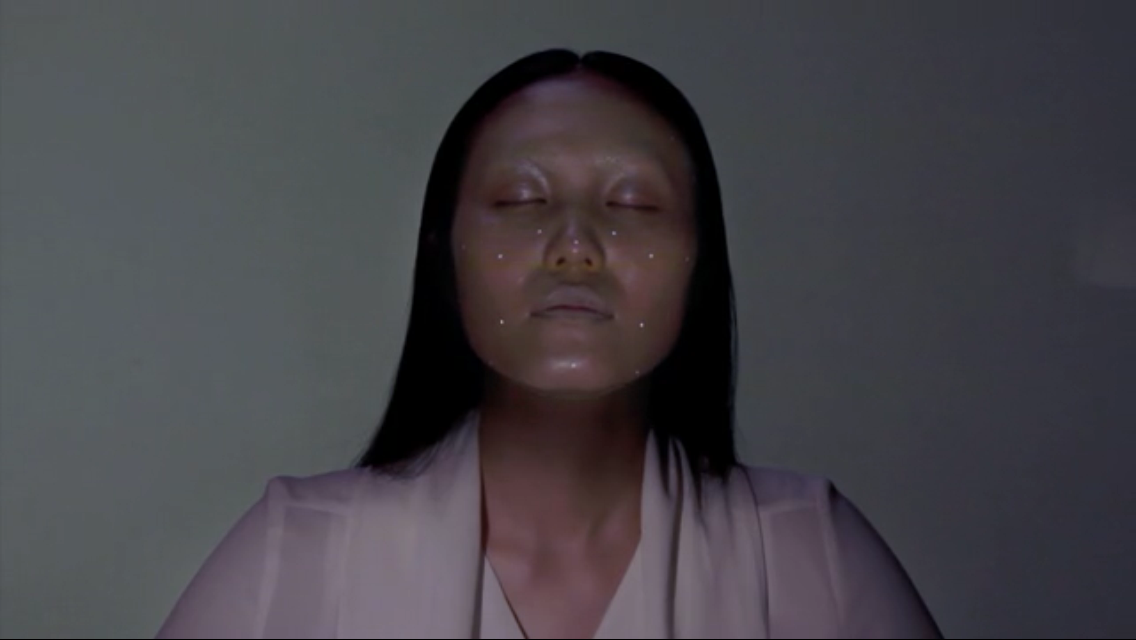
You will notice in the video there are dots around the edges of the actress’ face to define the total size and outer limits of the canvas, and then there are interior dots placed symmetrically on the face, with the center being the tip of the nose. These all create reference points for the software and the IR camera software translates this into the instruction of how to manipulate the 3D model being projected on the face.
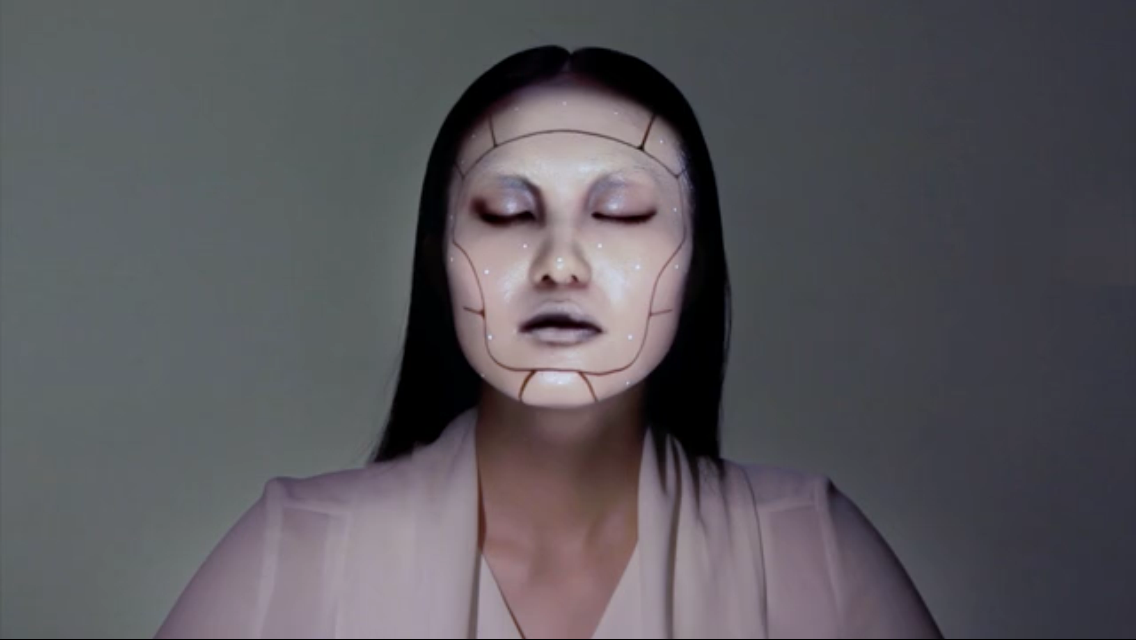
Image is being projected on the face based on orientation of the reflective dots.
As the orientation of the dots changes in real time, the IR camera software reports to the 3D modeling program to manipulate the 3D model.
4) Project
Given all of the above, the final step is to project the image on the face. This can be done with one or multiple projectors depending on how much of the surface you want illuminated and the desired viewable angles of the content.
In this case it is most likely a single projector with a medium output bulb (3000-5000 lumens) based on the size of the canvas being small and the angle desired being fairly limited for the camera shots.
And that’s it! 4 steps that are simple to explain but very difficult to actually implement well without the right skill sets and equipment. You can see why a great team or partnerships are essential in making this all happen.
I hope it was fun to explore the behind the scenes of a great video and post. Thanks for the inspiration Sara

More Stories Like This
Lucrative Future for Content Creation Despite Post-COVID Slowdown

By Paul Wylie and Olivia Lowden Futuresource Consulting The COVID-19-induced explosion of the content creation space continues to offer lucrative opportunities, as related technologies evolve and the COVID-19 user base becomes solidified. Intel from Futuresource Consulting’s recent survey shows double-digit growth in market value to over $2 billion in 2021, accounting for over 30% of […]
Home Content Creation in Flux after Record Levels of Growth

By James Kirby Futuresource Consulting After an extremely successful year in 2020, the home content creation market has undergone a major transformation. Whilst demand is currently experiencing a slowdown, 2021 broke records in terms of market value. That’s according to a new content creator report from Futuresource Consulting, which combines in-depth industry interviews with a […]
Projection Mapping Is Now a $3B Segment of Digital Signage — But Its Future Is Advertising
When we think of digital signage, we think drive-thru menu boards, retail store signage and even wayfinding on a college campus. But, the coolest part of the signage market (and the segment that the advertising industry is accelerating) is what’s commonly referred to by techies as Projection Mapping. Of course, everyone reading this would immediately […]